Renewable energy sources like solar and wind are ideal for powering equipment in remote locations. In this article, we’ll outline a step-by-step process for sizing an off-grid solar system so you can generate electricity even when you’re miles from the nearest power line.
These types of systems power off-grid homes, as well as a variety of industrial applications where equipment needs to be powered at remote work sites. Common applications include lighting, telecommunication equipment, sensors, environmental monitors, security cameras, traffic signals, water pumps, cathodic protection systems, and anything else that requires reliable power in a remote location.
The following guidelines are intended to help size an off-grid solar system based on a given location, energy requirements, and desired days of autonomy (how long the battery bank can supply power before it needs to be recharged).

Step 1: Determine Energy Requirements
First, you need to know how much energy the equipment uses on a daily basis. This is measured in watt-hours or kilowatt-hours per day. For example, let’s assume the equipment consumes 10 watts of power and operates 24 hours a day:
10 Watts x 24 hours = 240 watt hours per day or .24 kWh per day
How do you find this information? Check the data sheet or manual for your equipment to find out how much power it consumes (in Watts), and then multiply that by the number of operating hours per day. If possible, use a meter to measure the power consumption for an accurate real-world measurement.
If you are using an inverter to produce AC power for a load, remember to account for the inverter’s self-consumption and efficiency losses. Inverters consume a small amount of power while they are operating. Reference the inverter spec sheet, and add the self-consumption to your daily total. Inverter self-consumption typically ranges from under 1 watt, to around 30 watts depending on the inverter.
Efficiency losses can be from 5% to 15% depending on the inverter and how much it’s loaded. This will be accounted for when sizing the batteries. It’s important to invest in a quality, high-efficiency inverter.
Step 2: Evaluate Site Location
Next, determine where the system will be installed to estimate available solar energy.
Use a solar insolation map (also called a ‘sun hours map’) to estimate available PV resources. The system should be sized based on the month with the highest power consumption and/or lowest solar resource, typically December or January.
The National Renewable Energy Laboratory (NREL) has an online resource for mapping available solar radiation. Here is a map of the minimum daily sun hours in January in the United States with a south-facing array:
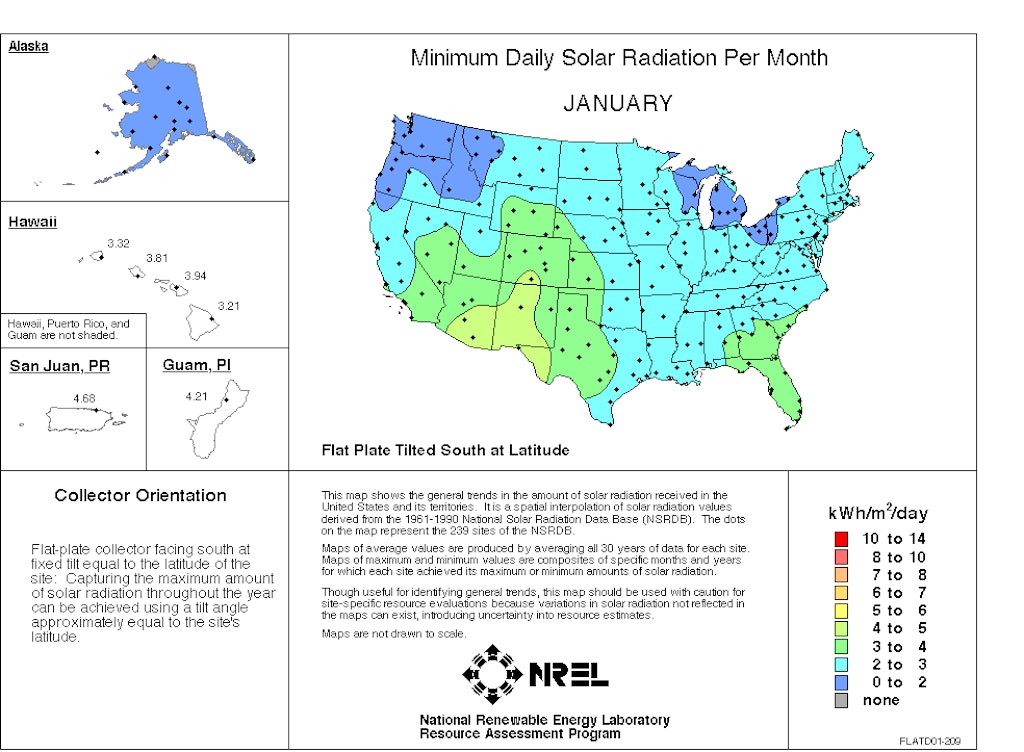
Most of the US has fairly low solar insolation in January. Generally, 2.5 sun hours is a good estimate, but it could be lower or higher depending on your location. We will use 2.5 minimum sun hours for our example.
Solar panels are designed to be installed in full sun. Shade is going to impact performance. Even partial shade on one panel will have a large impact. Inspect the site to make sure your solar array will be exposed to full sun during daily peak sun hours. Keep in mind that the sun’s angle will change throughout the year.
Other Considerations
There are a few other things to think about at this point:
System voltage: Determine what power requirements your equipment has. Off-grid PV systems typically output these common voltages: 12Vdc, 24Vdc, 48Vdc, or 120Vac.
Solar panels and batteries use DC power, and some equipment can be wired directly to the batteries provided it can handle real-world battery voltages. These can range from 10-15 volts for a 12-volt system, 20-30 volts for a 24-volt system, and 40-60 volts for a 48-volt system.
Days of autonomy: The number of days the equipment must operate on battery power with limited solar power. Between 5-20 days is typical, depending on the area and expectations for operating performance. You need enough autonomy to keep the equipment operating through extended periods of overcast weather.
Step 3: Calculate Battery Bank Size
Now we should have enough information to size the battery bank. After the battery bank is sized, we can determine how much solar power is required to keep it charged.
Here is how to calculate battery bank size in our example of 240Wh/day based on lead-acid batteries:
First, we need to account for the inefficiency of the inverter (if you are using an inverter). Depending on the equipment, 5-15% is usually reasonable. Check the spec sheet for the inverter to determine the efficiency. We’ll use a 10% inefficiency for this example:
240 Wh x 1.1 efficiency compensation = 264 watt hours
This is the amount of energy drawn from the battery to run the load through the inverter.
Next, we need to account for the effects of temperature on a battery’s capacity to deliver energy. Lead-acid batteries lose capacity as temps go down and we can use the following chart to increase battery capacity, based on the expected battery temperature:
For our example, we’ll add a 1.59 multiplier to our battery bank size to compensate for a battery temperature of 20°F in the winter:
240 Wh x 1.1 x 1.59 = 419.76 watt hours
Next, account for the efficiency loss that occurs when charging and discharging batteries. Typically we use 20% inefficiency for lead-acid batteries, and 5% for Lithium-ion.
240 Wh x 1.1 x 1.59 x 1.2 = 503.71 watt-hours minimum energy storage requirement
This is for a single day of autonomy, so we need to then multiply it by the number of days of required autonomy. For 5 days of autonomy, it would be:
504 wh x 5 days = 2,520 watt hours of energy storage
As you can see, the battery bank size is quickly increasing due to factors including temperature and required days of autonomy. All of these things affect your battery bank size significantly and need to be carefully considered.
Lead-acid batteries are commonly rated in amp hours (Ah) rather than watt-hours (Wh). To convert watt-hours to amp hours, divide by the system’s battery voltage. In our example:
2,625 Wh ÷ 12v = 220 Ah 12V battery bank
2,625 Wh ÷ 24v = 110 Ah 24V battery bank
2,625 Wh ÷ 48v = 55 Ah 48V battery bank
When sizing a battery bank, always consider the discharge depth, or how much capacity is discharged from the battery. Sizing a lead acid battery for a maximum 50% depth of discharge will extend the battery’s life. Lithium batteries are not as affected by deep discharges, and can typically handle deeper discharges without substantially affecting battery life.
Total required minimum battery capacity: 2.52 kilowatt hours
Note that this is the minimum amount of battery capacity needed, and increasing the battery size can make the system more reliable, especially in areas prone to extended overcast weather.
Step 4: Figure Out How Many Solar Panels You Need
Now that we’ve determined battery capacity, we can size the charging system. Normally we use solar panels, but a combination of wind and solar might make sense for areas with good wind resource, or for systems requiring more autonomy. The charging system needs to produce enough to fully replace the energy drawn out of the battery while accounting for all efficiency losses.
In our example, based on 2.5 peak sun hours and 240 Wh per day energy requirement:
240 Wh / 2.5 hours = 96 Watts PV array size
However, we need to account for real-world losses caused by inefficiencies, module soiling, aging, and voltage drop, which are generally estimated to be around 15%:
96 array watts / .85 = 112.94 W minimum size for the PV array
Note that this is the minimum size for the PV array. A larger array will make the system more reliable, especially if no other backup source of energy, such as a generator, is available.
These calculations also assume that the solar array will receive unobstructed direct sunlight from 8 AM to 4 PM during all seasons. If all or part of the solar array is shaded during the day, an adjustment to the PV array size needs to be made.
One other consideration needs to be addressed: lead-acid batteries need to be fully charged on a regular basis. They require a minimum of around 10 amps of charge current per 100 amp hours of battery capacity for optimal battery life. If lead-acid batteries aren’t recharged regularly, they will likely fail, usually within the first year of operation.
The maximum charge current for lead acid batteries is typically around 20 amps per 100 Ah (C/5 charge rate, or battery capacity in amp hours divided by 5) and somewhere between this range is ideal (10-20 amps of charge current per 100ah).
Refer to the battery specs and user manual to confirm the minimum and maximum charging guidelines. Failure to meet these guidelines will typically void your battery warranty and risk premature battery failure.
Here are standard configurations of PV arrays with battery banks. The battery capacity calculated in the previous step can be compared against this table to find a suitably sized system:
| Array Size: PV Watts (STC) | Battery Bank Size: Watt Hours (@ C20 rate) | Battery Bank Ah Capacity |
|---|---|---|
| 100-175 | 600 | 50Ah @ 12Vdc |
| 200-350 | 1,200 | 100Ah @ 12Vdc 50Ah @ 24Vdc |
| 400-700 | 2,400 | 200Ah @12Vdc 100Ah @ 24Vdc |
| 800-1,400 | 4,800 | 400Ah @ 12Vdc 200Ah @ 24Vdc 100Ah @ 48Vdc |
| 2,000-3,000 | 9,600 | 800Ah @ 12Vdc 400Ah @ 24Vdc 200Ah @ 48Vdc |
| 4,000-6,000 | 19,200 | 800Ah @ 24Vdc 400Ah @ 48Vdc |
| 8,000-12,000 | 38,400 | 800Ah @ 48Vdc |
This information is intended to be a general guide and there are a lot of factors that can influence system size. There are also alternative options such as incorporating a backup gas generator or wind generator(s) to reduce the minimum battery requirement.
If the equipment is critical and in a remote location, it pays to oversize it because the cost of maintenance can quickly exceed the price of a few extra solar panels. On the other hand, for certain applications, you may be able to start small and expand later depending on how it performs. System size will ultimately be determined by your energy consumption, the site location and also the expectations for performance based on days of autonomy.
If you need help with this process, feel free to schedule a free consultation with us and we can design a system for your needs based on the location and energy requirements.