- System Size: 11.21 kW
- Yearly System Output: 19,200 kWh
- Federal Tax Incentive: Qualifies for $8,000 U.S. Federal Tax Credit
- Utility rates per kWh: Varies with time-of-use


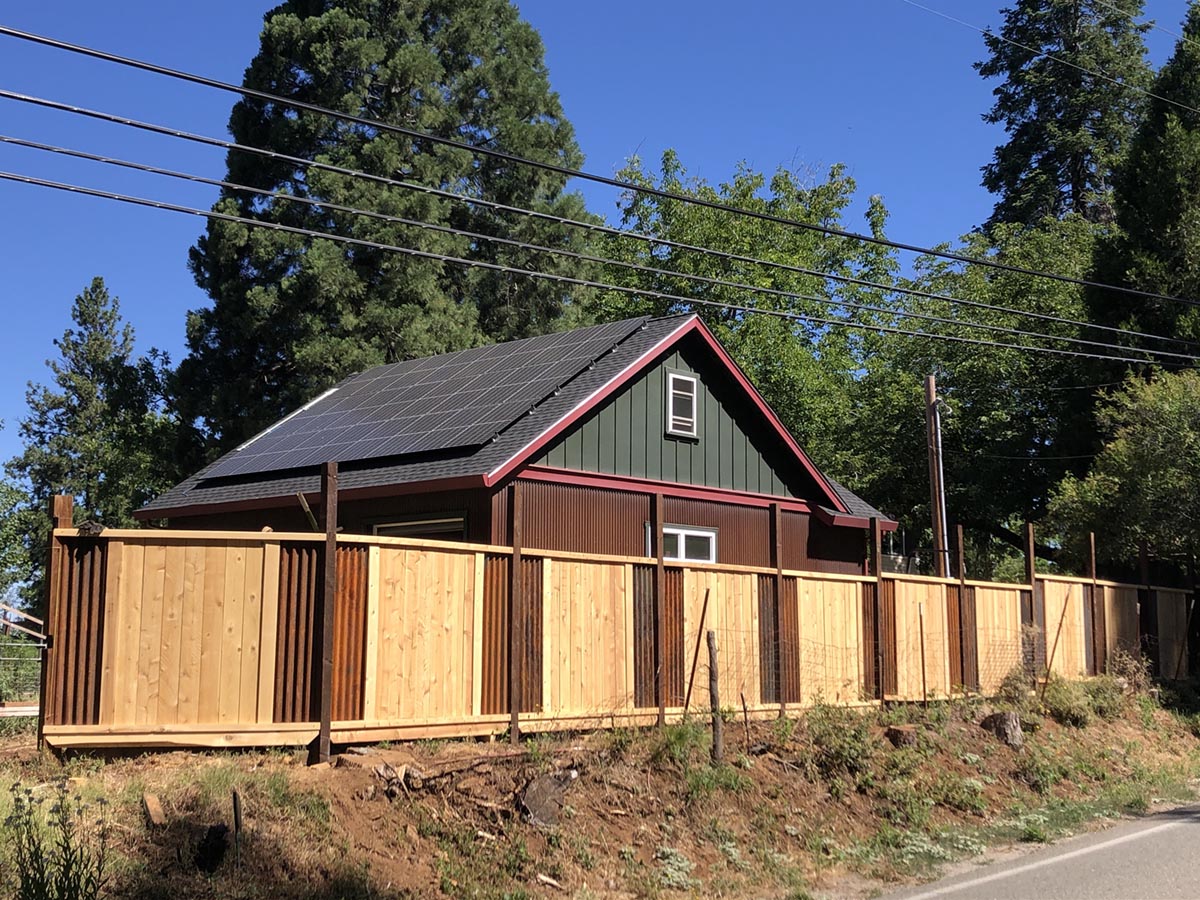
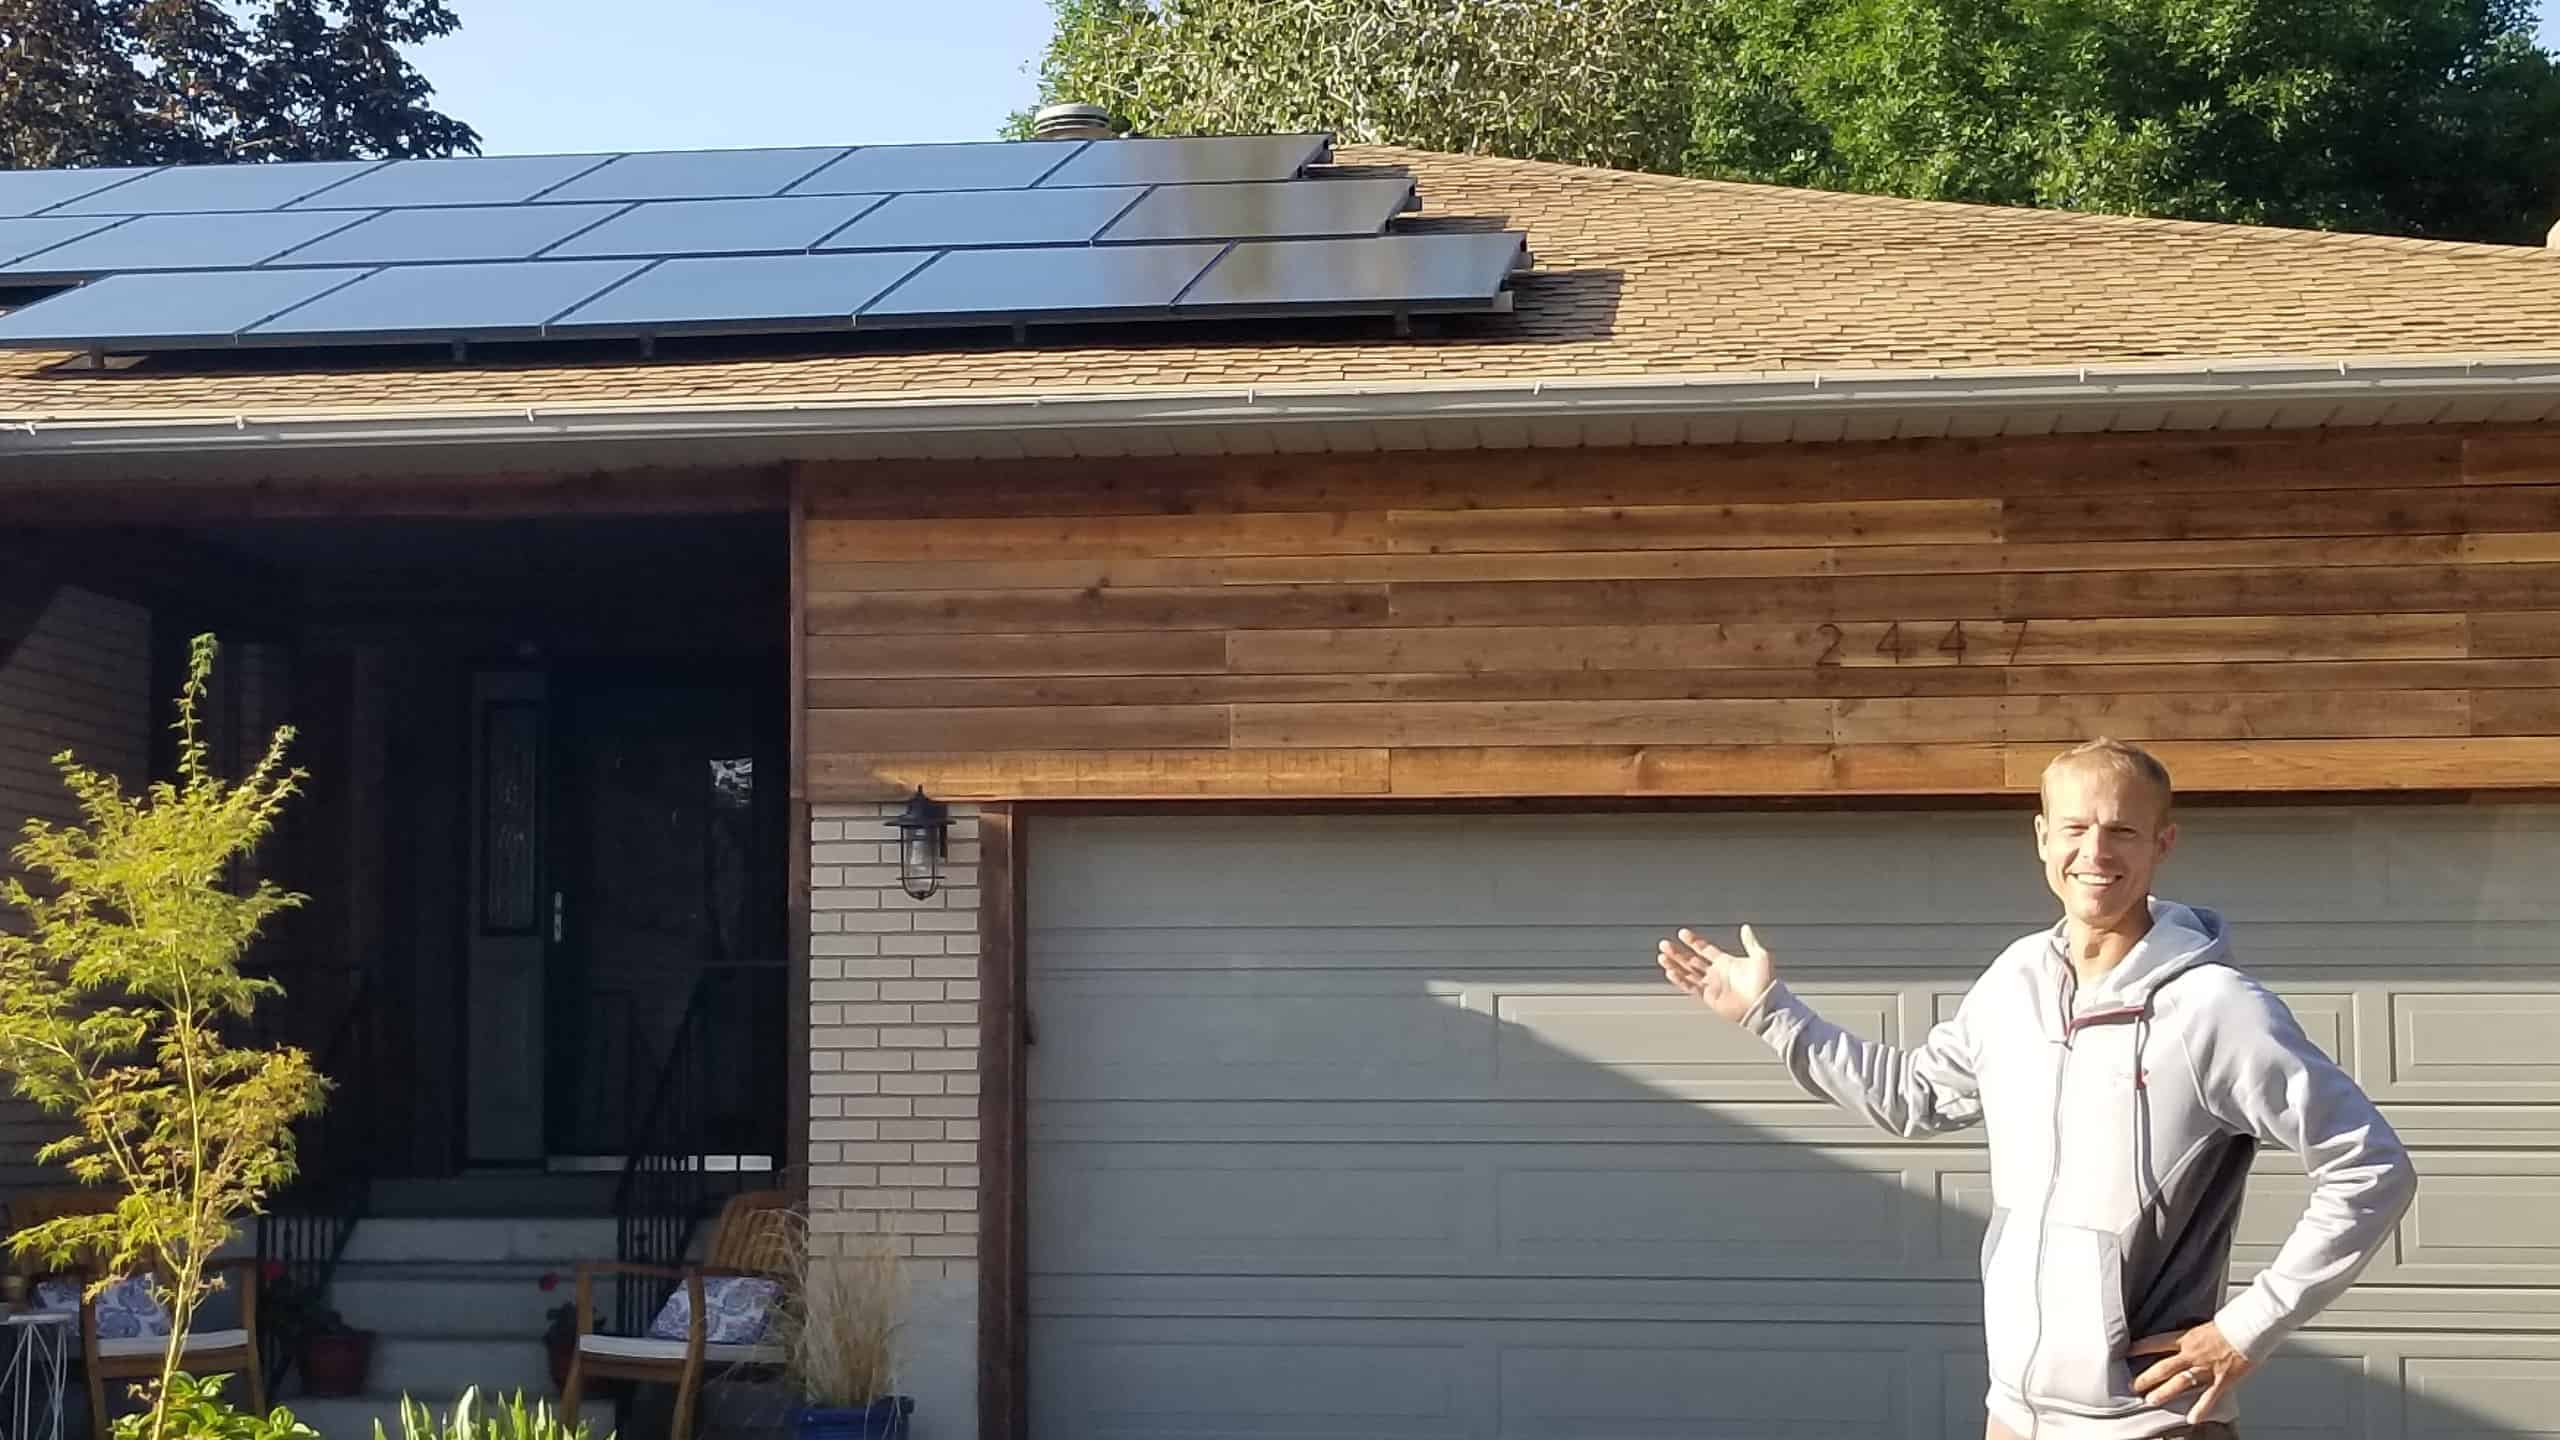
Defying Expectations with Tom M.
It feels great to prove your doubters wrong. Just ask our May Install of the Month recipient, Tom M.! He installed his DIY system for two and a half times less than what other solar companies wanted to charge him. Now, he’s free from the power company’s ever-increasing rates.
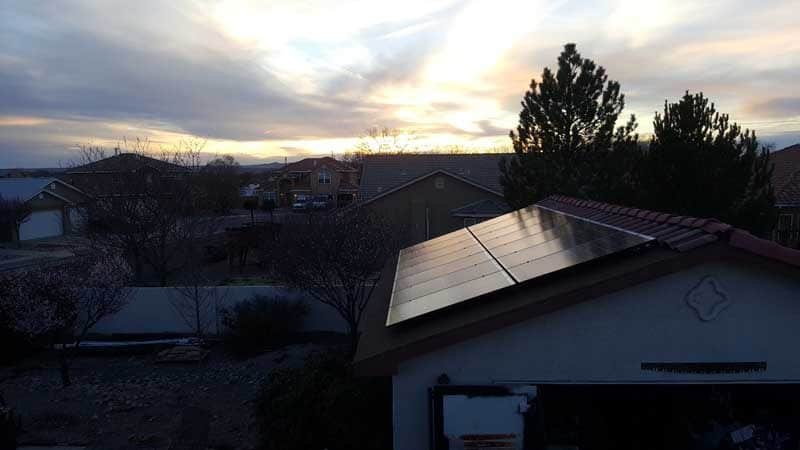
This month’s Install of the Month goes to Tom M and his large grid-tied installation in Albuquerque, NM.
When Tom started to tell people he wanted to go solar, they looked at him sideways. Albequerque has a long permitting process and strict electrical requirements. And he would face push-back from his Homeowner’s Association. But he knew the long-term rewards were worth the effort.
Tom didn’t plan on going the DIY route at first. He contacted a few local companies for quotes. But they tried to nickel-and-dime him on installation charges and wouldn’t customize the system to his liking. He soon got to the point where he knew that he would rather do it himself.
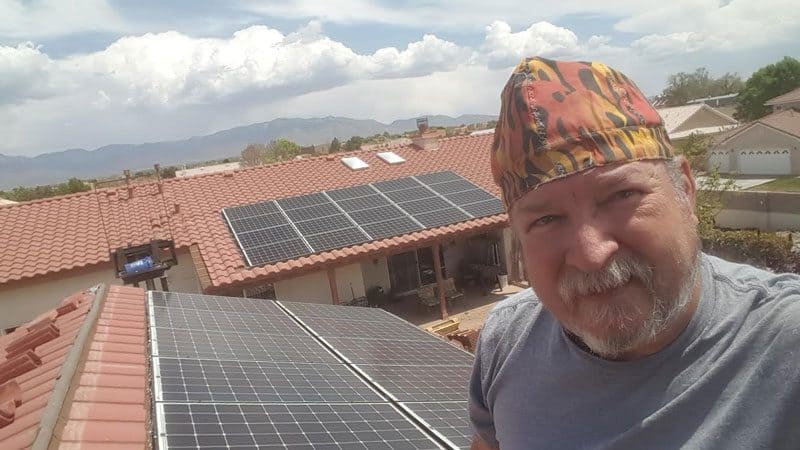
Tom contacted Wil at Unbound Solar, who is also a New Mexico resident and familiar with local regulations. 9 days after he got his equipment, Tom had installed his own solar PV system.
When it came time for inspection, his HOA had to admit Tom’s work well exceeded their expectations. And the electrical inspector? They said it was the largest self-installed system they’d ever seen, and they’d never seen one done so professionally.
Interview with Tom
What was your primary reason for adding solar to your home?
Saving money because of constantly increasing rates from the local electric company.
Did you have any previous DIY experience?
I am a self taught DIY’r. I have a great workshop and lots of experience in home repair and other projects.
What was the most difficult part of the installation?
The most difficult part was getting the proper permits through the city. The building permit was just a payment, but the electrical permit required passing a city electrical test, following NEC 2014 rules, to allow work on my personal residence. I was also required to get a reroof permit due to the type of installation that I performed. The HOA also only provided a conditional approval since they didn’t feel it was possible for a self install to meet their requirements. However, it exceeded their standards and received compliments from all the neighbors.
How many helpers did you have?
Family helped by handing tools up to me on the roof, otherwise no additional assistance.
Did you hire a contractor?
I did not hire a contractor for any part of the installation
Were there any unforeseen additional parts or tools you needed?
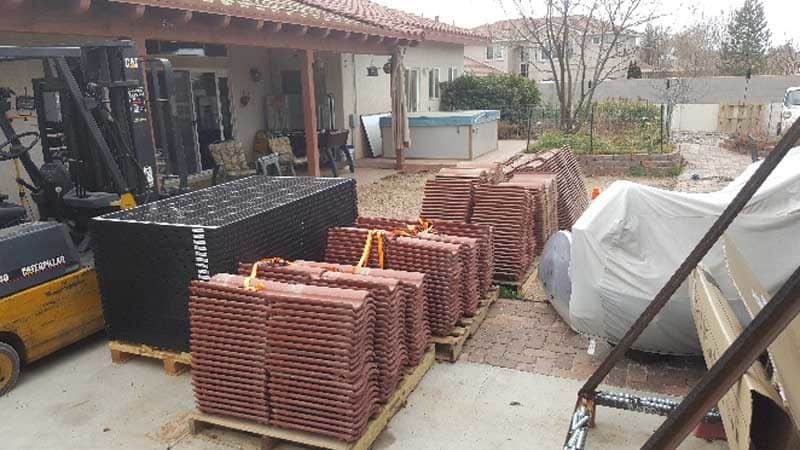
I needed engraved placards for outside labeling of the equipment. Due to removal of 9 pallets of concrete tile and lifting 34 panels up, a forklift was a helpful tool in getting equipment and parts up and down from the roof.
How long was the full installation process?
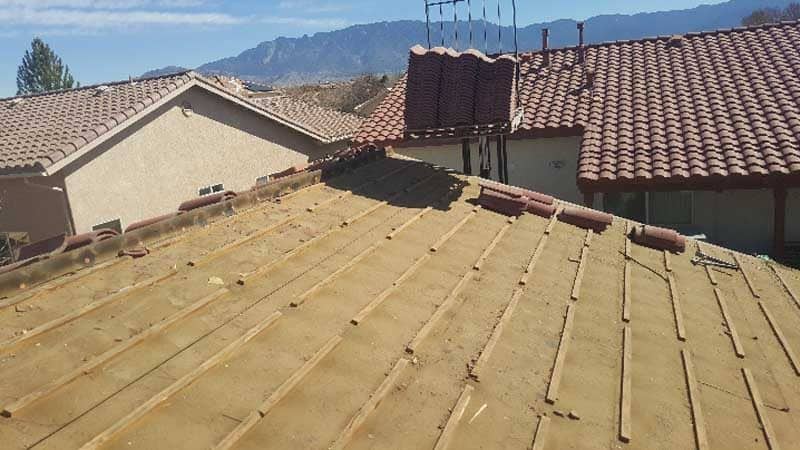
Total installation time was 9 days. The permitting process was over a period of 3 months. This time included removing concrete tile then re-roofing with asphalt shingles to protect the house under the panels. Due to the HOA requirements that no more than one foot of conduit be exposed, I put all penetrations under the panels to protect them. I also installed chicken wire around all 4 sides of both arrays to keep the birds out. Concrete tile was then replaced up to the edge of the arrays to make it look like the roof was tile. The arrays are embedded at a level no higher than the concrete tiles.
How did it feel to get your solar project finished?
A true sense of accomplishment, and a great feeling when the electrical inspector stated that he had not seen a self install system that large and one that had been done so professionally.
Who else did you consider before choosing Unbound Solar?
CST Solar and Positive Energy in my city. But when they started charging for every little item and when they refused to install the way I wanted, I got fed up with them and decided to install myself. Their cost was two and a half times as much as what I spent.
What was your total solar install costs? (Ball Park)
$24,000
How much did you save on your taxes
$8,000
Components in Tom’s custom system:
- 38 295 watt SolarWorld Solar Panels
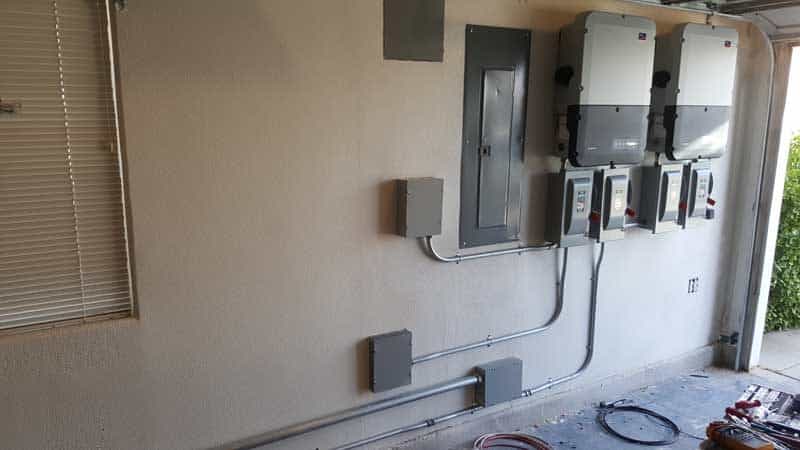
- 1 SMA Sunny Boy 6.0 Inverter
- 1 SMA Sunny Boy 3.8 Inverter
- IronRidge XR1000 Rail System
Tom’s Solar Breakdown:
- Cost of Contractor: None
- Cost of Electrician: None
- Total Hours to install: 9 hours
- Design Output of kWh per year: 19,200 kWh
- Federal Tax Incentive: Qualifies for $8,000 U.S. Federal Tax Credit
- Utility rates per kWh: Varies: different rate plan options and TOU rates in place
- Average Monthly Utility cost: Varies: different rate plan options and TOU rates in place
The Full Story in Tom’s Words:
We wanted to be the first in our neighborhood to have solar… We started thinking about solar when we bought a nice 50 acre piece of property in eastern Arizona in 1998. The closest power was 9 miles away and cost prohibitive, so solar became the answer. Well, as with all things in life, the only constant is change. Having children, and a change in career that moved us overseas put the whole project on the back burner.
Over the years, the power companies continue to increase their costs, and our increasing need for more and more power has made us reevaluate things.
Fast-forward to 2016, and life has started to settle down. Over the years, the power companies continue to increase their costs, and our increasing need for more and more power has made us reevaluate things. We still have the property in Arizona, but we are focused on daily life in our home in Albuquerque, NM. One day while shopping in Home Depot, there was a sales representative from a local solar company. Out of curiosity I asked them to come out to the house for an evaluation and quote. I knew that we were going to be one of the larger residential systems that they would design to install.
COMPLICATIONS… AND A SURPRISE EXTRA $20,000
We ran into complications. There were limitations from the power company, the city mandated that our system could be no larger than a 10kW grid-tied system and our the Home Owners Association said that the panels would have to be parallel mounted to the roof and be within 4 inches of the existing roof. Also we should have less than one foot of conduit exposed on the roof, and that there should be limited additional equipment installed on the outside of our house. After taking some measurements, they came back to us with a quote of $32,000 to have a fully installed and completed system. We were also informed that Nusenda Credit Union was the only financial institution in our area that would provide loans for solar. It is refreshing to think that they see the potential and return on investment when this cutting edge technology is done properly. However, we did not need this service because we chose instead to pay cash. Our return on investment would be immediate for us. We signed a contract from the solar company, and then came the change orders and additions. Because we were splitting the arrays between two buildings, they wanted to charge almost $5,000 for trenching and putting conduit in the ground. Additionally, the 75 foot run between buildings would cost almost $500 dollars for the two 10 gauge DC wires to be connected to the system. We were told that they would be unable to tie into the existing power panel, as it would need to be upgraded to a 200 Amp service. Our service at the time was 100 Amps. Finally, they said that they would need to outsource any roof issues to a roofing company. The system that they designed for us would be 14 panels that would be pointed due south on the workshop, and 20 panels that would face due west on the house. The workshop was one string, and the house would have two strings of 10 each. In the garage, we installed two SMA grid tie inverters. By having 3.8k for the workshop, and 6k for the house, we would be below the 10k maximum imposed by the power company. We originally had wanted a system that was enough for our total needs. When we showed them a one line drawing of how we wanted the system, they said they couldn’t do it that way because it would take too much effort to install and be cost prohibitive. I was sensing that we didn’t fit into their cookie cutter design and that they may not have installers that were skilled for this type of work. As the customer, we wanted it our way and were willing to pay the cost differential. After consulting with their designers, managers and technicians for 6 months of design, they gave us a new estimate for almost $52,000. Imagine the look on our faces when we saw the new cost and the return of investment changing to about 15 to 17 years. We politely asked them to leave after deciding it was time to pull the plug due to the cost and inability to work to our specifications.
After consulting with their designers, managers and technicians for 6 months of design, they gave us a new estimate for almost $52,000. Imagine the look on our faces when we saw the new cost and the return of investment changing to about 15 to 17 years.
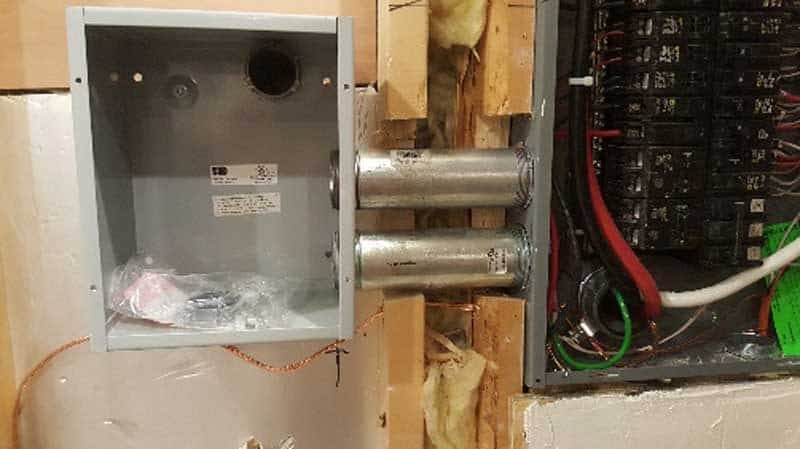
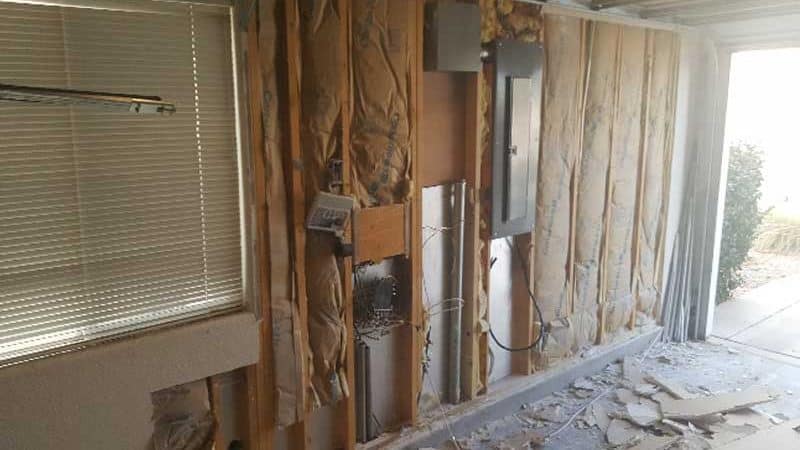
At dinner that evening, we discussed the events of the previous months, and decided that I was handy enough, and should consider doing the install myself. The next day I began the long process of obtaining permits, and making drawings and designs. We looked for suppliers of equipment, and found Unbound Solar. We had an idea of what we wanted, and with the expert assistance from Wil Burlin, we started the process on our own. It took two years to find a contractor that would agree upgrade the power panel to the house. Due to construction changes, a new underground feeder, meter can, main disconnect would need to be installed. While we were at it, we had them move the service panel into the garage so that we could have better access and would not have to go outside at night in the rain to check a breaker.
At dinner that evening, we discussed the events of the previous months, and decided that I was handy enough, and should consider doing the install myself.
CHOOSING DIY
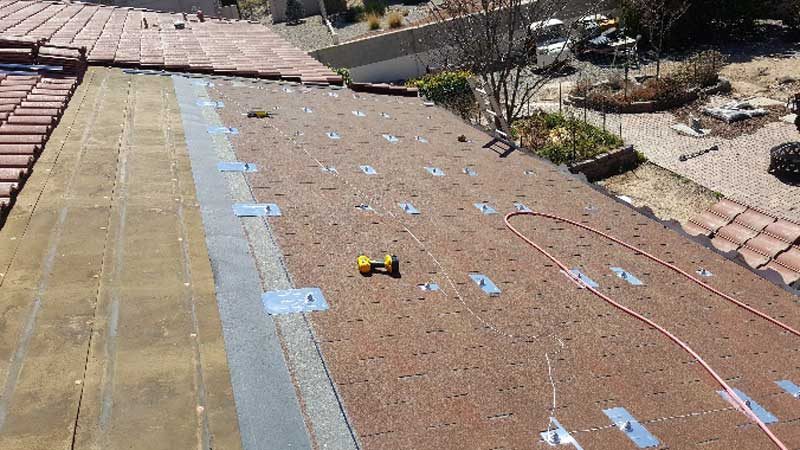
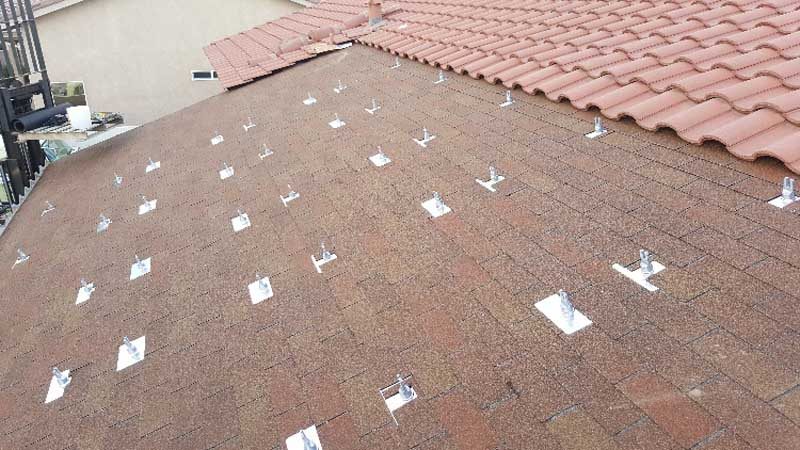
Now to the good part…. We contacted Wil again, and he still had our original specifications. With a few changes, we finalized the order. Within 3 weeks, we received our shipment. During those three weeks, we ordered all the additional items we would need for our custom install, and I also started the permit process. For several weeks we would be receiving packages containing heavy duty switches, wire, breakers, conduit, ground lugs, labels, roof flashings, and waterproof boxes, from UPS, FedEx and USPS. It was like Christmas in April. Also during the time that we were waiting for delivery, we worked on prepping the roof. We didn’t want the panels to be installed on top of our tile roof, so we removed the roof tiles. We found that the underlayment had water damage. If the local solar company contractors would have installed their system on top of the tile, we wouldn’t have known how much damage we had underneath.. Once the tiles were removed, we placed new underlayment, and installed a good 30-year shingle with all the proper flashings for a weatherproof roof. We also had our local roofer come out and reseal all the skylights, roof penetrations and other problem areas. Next, we installed the Flashfoot 2 mounts and weather tight conduit flashings. We cannot say thank you enough for the Flashfoots as they were simple to install, and provided a weather tight and sound foundation for the rail system. Then we installed of the rails, and made sure they were all level and true. This is probably the most important step! Make sure they are straight, level and tight, as it will make the rest of the process go extremely quick. It is amazing how much a simple string line can do to help make everything square, true, level and straight. Hint… Don’t skimp on the roof mounts, penetrations or the amount of sealant. Spend the time and money on it now so that you don’t have to take it off later.
When submitted, my design approval with the power company was flawless, and only took about 4 days.
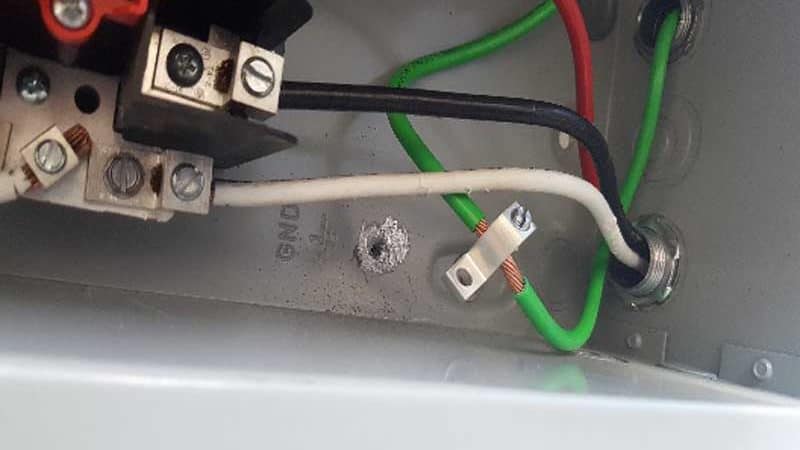
When submitted, my design approval with the power company was flawless, and only took about 4 days. The approval process with the city was a little more in-depth, and it took me four trips to the city’s planning office to get the drawings approved. We paid for the building permit, but we were not informed that we needed an electrical permit. Because we were doing a self-install, they could not provide us with a permit unless I took, and passed, the city electrical test which would allow me work on my own home. I passed, so we were then almost legal. Reroofing, due to the damaged underlayment, caused the need for a reroof permit. It seemed like the city was reaching deeper and deeper into our pockets. After paying $700, we finally had the permits we needed to start the actual work. Installation of the panels came next, and it went very fast. We actually had 14 panels on the workshop in less than an hour and then 16 of 20 on the house in about the same amount of time. Connections were easy and the final connections to THHN wire were in junction boxes already located in the attics. Panels were connected to the equipment in the garage through wires in ¾ inch conduits. Inverters, switches, production meter, fire department disconnect, a Generator disconnect relay, and to make it look good, we used no flex conduits. It took a bit longer, but all electrical (even in the attics) was run through ¾ inch EMT conduit that was bent to give it that professional and industrial look. EMT conduit also allows for easier pulling of wire on long runs versus flex conduit that the contractors wanted to use. This all took a bit longer, but in the end made it look and function much better. For the runs from the workshop to the house, we dug a trench, 6 inches wide 16 inches deep and put multiple runs of one-inch schedule 80 PVC conduits. We would then backfill the trench, and then lay 6 inches of concrete sidewalk over the trenched area The electric wall in the garage also had extensive work and upgrades. The drywall was removed, and some conduits were hidden in the wall with a few junction boxes for access. Plywood was hung on the wall, and it was textured and painted. Equipment was then hung on the exterior of the plywood. How many times you’ve tried to hang something on drywall only to have it sag or fall off. By using the plywood, you cannot tell any difference from the other garage walls, but you are able to mount anything anywhere and know that it is secure. The inverters, switches and conduits all looked great. We added more than the normal number of disconnects so that we can have an AC disconnect both inside and outside. We also added a DC disconnect for each string, before each inverter so that we can perform maintenance on part of the system without shutting the entire system down.
GETTING IT APPROVED
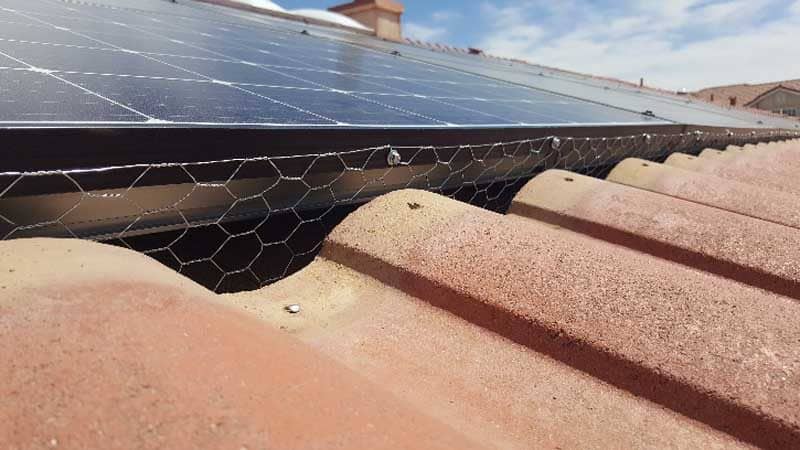
Once everything was complete, we called for an inspection of the three permits (City electrical, city reroof, and building. The reroof and building permits were passed, but the electrical inspector was going to fail the install because the paint had not been removed from behind the ground lugs in the disconnect switches, even though the grounding screws had good contact. Unfortunately, the inspector couldn’t come back that day. But he did say that if we sent him a photo of the modifications before 3:00PM, that he would approve it and put it into the city’s computer. We ended up receiving a full approval. Next, we called the power company. They came out about 5 days later to install the production meter and to turn the system on. We didn’t even have to be home for this. When we came home, we found the system was working, and that it had immediately started producing power. Better yet, our meter was running backwards. Because we use SMA inverters, we have programmed them to connect to the Sunny Portal application on our phones where we can monitor the power from anywhere that we have an Internet connection. It sends daily reports to our phone at the end of each day. Our average power usage in April is 65kWh per day, and we expect more in July and August. In the beginning of this installation, and the many approvals and inspections, our Home Owners Association only gave use a conditional approval for installation. It seems like they wanted control of our project, and since it was a major project, they gave only a conditional approval because they didn’t know if we could actually do the install to their standards. We didn’t want to hurt their feelings by telling them that our standards are higher than theirs. We do understand their concern that not everyone is skilled enough to complete this monumental task. Another stipulation they had is that you can only have tile or metal roofing material in our neighborhood, and since we put shingles on the house, it wouldn’t pass their standards. To get around that, we protected our roof with the shingles, installed the solar system on top of that, and then replaced the tile right up to the edge of the panels. This way the panels are recessed in-between the tiles and no one can see the shingles. We also get some very strong winds during the year, and believe that the lower profile of the panels compared with the rise of the tiles will put less stress on the panels.
We have not heard of any protests from the HOA, but have heard praises from from our neighbors.
The shingles will last for a longer time because the panels are protecting them, just as the panels are protecting the production and ground wires and roof penetrations. We have not heard of any protests from the HOA, but have heard praises from from our neighbors.
EASIER THAN YOU MIGHT THINK
To regress a bit, we talked with many others that have solar systems, and many complain that they have birds making nests under the panels. Think of that, a dry, protected, and warm place to build a nest to raise youngin’s? We would think the same. However, not wanting to encourage the birds, we spent a little extra on bird proofing them by installing chicken wire to the panels, then down to the roof and under the tiles. Once the roofing tiles were replaced, the chicken wire almost disappeared, and now we have no worries about birds. All power and ground wires are protected under the panels and all the electrical controls are in a nice protected garage. The only thing you see on the outside of our home is the production meter and a single fire department disconnect. Due to city regulations, engraved placards are required to be placed on the equipment. Through PV Labels on line, they were easy to work with, and they completed custom labels that should outlast the life of the system. Although this was a family project, I performed most all of the work. My wife, and daughters would occasionally help by helping to move and stack the panels, handing up tools, light up parts in the dark, keeping me fed, or filling up my water cup to keep me hydrated. I’m glad we did it in April, and not in July. It was warm, but July would have been a lot more uncomfortable. I also made use of a used forklift that we had purchased last year for other projects. I was grateful to have it while lifting the panels and lowering the excess roof tiles. Without the forklift, I would have seriously thought about hiring a younger helper to help me move the 9 pallets of tiles from the roofs to the ground. In summary, this all sounds like an unthinkable self install project. However, it looks great, and it was easier than you might think. The system from Unbound Solar works great. Our total cost was about $25,000 along with some sweat equity. After federal rebates of $7500, the total price out of our pocket is about $17,500.
After federal rebates of $7500, the total price out of our pocket is about $17,500.
If we had financed this project, the return on investment would have worked out to about 4 years. But instead we are free and clear from payments. The total time invested was about two weeks for permits, and 9 actual days of installation.
Would I do it again? Absolutely. Do I recommend this to others? Absolutely.
The best thing about all of this is the freedom from increasing electrical costs. Would I do it again? Absolutely. Do I recommend this to others? Absolutely. It is a part of the house that just works for us and for our environment in a positive way. I guess the only thing that I have left to do is to spray the dust off of the panels from time to time.
It’s Your Turn
Download your free Getting Started With Solar guide and conquer your solar project! We’ll help you navigate the permitting process, choose high-quality products, claim valuable state and federal tax incentives, and save money on installation costs.

Continue Reading
Kris Z.’s Solar Installation
- System Cost: $9,000 including installation
- Yearly System Output: 8,061 kWh per year
- Federal Tax Incentive: Qualifies for $2,700 U.S. Federal Tax Credit and $1,600 State Tax Credit
- Utility Rates: 10.3 cents/kWh
Install of the Month – June 2017
- System Size: 8.97 kW
- Yearly System Output: 13,006 kWh per year
- Federal Tax Incentive: Qualifies for $3,886 Federal tax credit
- Utility Rates: 12.7 cents/kWh